Project Explorer: Difference between revisions
No edit summary |
No edit summary |
||
| Line 1: | Line 1: | ||
[[file: | [[file:projectexplorer.png|center]] <br /> | ||
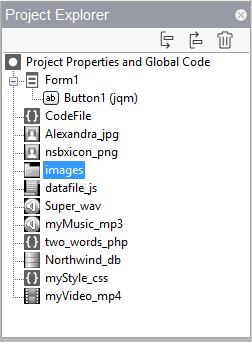
The Project Explorer gives a layout of the project and lets you navigate through its parts. | The Project Explorer gives a layout of the project and lets you navigate through its parts. | ||
Revision as of 16:54, 5 May 2015

The Project Explorer gives a layout of the project and lets you navigate through its parts.
The top line brings up the global Code and properties for the project. A Code Window tab will open, and the project’s properties will show in the Properties Window.
Clicking on a line that has a form will open the layout of the form in the Design Screen. The form’s properties will show in the Property Window.
Clicking on Code line within a form will display a Code Window with the code for that form and the form’s properties in the Properties Window.
Clicking on a control within a form will bring up the Design Screen with the control selected on it. The properties of the control will show in the Property Window.
Use the down arrow icon to move the currently selected item down the list, and use the up arrow icon to move it up. Controls higher on the list will go behind lower items if they overlap.
Use the trashcan to delete the currently selected item. There is no undo.
To change the name of a control or form, double click on its name in the Project Explorer, or edit the id in the Properties Window.
To add an external file or Code Module to your project, drag and drop it into the Project Explorer. The file will then be deployed with your project: there is no need to add it to your manifest. Files types can be folder, images (png, gif, jpg, bmp), sounds (wav, mp3), SqlLite databases (.db), and other common types (js, json, css). Keep the files which your project uses in your project's directory, so they can be properly deployed.
Next: Properties Window